Disclaimer: We are getting con-fi-dent in this creative DIY world. It’s like a semi-addiction- once you successfully conquer one DIY, you can’t stop. We can’t lie, our latest project makes us a little giddy inside- we consider it our most genius DIY yet. Brace yourselves!

Even though the office isn’t quite complete yet, we decided to share one of our favorite makeover projects that we’ve tackled thus far. We’d been searching high and low for a gold-speckled rug for the office ever since we laid eyes on the one in Freda Salvador’s San Francsico boutique. Unfortunately, theirs was from Spain {no thanks, shipping costs!}. We bookmarked a couple of other options online that were ok, but finding the right color hide with the added gold accents we loved was a challenge and not to mention, they were running close to $800!

Determined to do this on the cheap, we dug a little deeper and found this DIY that inspired us to gold speckle our own rug. We bought a super affordable one {under $300!} on Amazon and put our skills to the test- woot!

gold-hide-rug-diy-tools

Have no fear, we’re not pulling your leg when we say that this is the easiest DIY you’ll ever tackle- the results are ah-mazing! All you need is your favorite gold spray paint {we love Design Master’s in 24kt or 12kt gold!} and a cowhide {Amazon, Ikea, Overstock all have great, affordable options!}.

hide-rug-diy

Step 1: In a well ventilated space, spray paint into side of cap, in a heavy, concentrated stream. You’ll want a small puddle of wet paint in the cap.

diy-hide-rug

Step 2: From about 12 inches from the rug, drip paint quickly. You’ll start seeing a pretty even amount of big and small splatters.

gold-hide-rug

Step 3: To achieve smaller drips and splatters, stand up and “throw” the paint onto the rug. This technique creates nice movement on the piece.

hide-rug-2

Step 4: Step back and take a look at your handy work! Go into areas that need specific gold spots and drop paint closer to rug, about 4-6 inches above. You should achieve bigger spots with this technique. Remember: the more paint in the cap, the bigger the gold spot.

We found the “drop” technique was our favorite in order to achieve the look we wanted. Take a few minutes prior to starting, practicing all three techniques on a scrap cloth to see which you like best!

Gold-hide-rug-diy

And 10 minutes later {you move fast when working with wet paint!} you have your finished product! We LOVE the way the rug came out, but you’ll have to wait for the full reveal in the office to see it all. Stay tuned!

In the meantime, is there a spot in your house that could use a little update? You have to try this DIY for yourself- for less than $300 you can achieve a look of a high end rug that would have cost three times the price. It looks like we’re slowly leaving the “DI-buy” team for the DIY team!

original photography for apartment 34 by Aubrie Pick 

Progress on the office makeover continues {albeit slowly!}. Things are finally falling into place though so we thought it was time for another progress update.

One piece we had to say goodbye to was my lovely desk. Now, I’m not actually ditching this prized possession. The beautiful petrified wood piece is sticking around, it’s just physically leaving the office. There are no ways around the fact that a single desk is just not big enough for four people to sit at and work efficiently. What we need is something communal, spacious and designed to help us all get down to business!

office-desk-3office-deskoffice-deskswhich-desk-1desksget your shop on: 1 // 2 // 3

Truthfully, we’ve already picked one of these beauties and it’s soon to be revealed with the rest of the office {woot!}, but all three of these tables are great options if you’re looking for the same modern, communal work space, or if you’re just looking to spread out your personal work station.

So we figured we could play a game {because we love games!}. Which desk do you think made the cut? Is it the mid-century style Parker table? The durable and sleek Strut table? Or the smooth Aqua Virgo table?!

You’ll have to stay tuned to find out!

image 1 via Line Klein // 2 via // 3 via Genbyg Design // 4 via ATWTP

The plant is back in the building {woot!} and we’re loving the extra life and greenery it brings to a space. Any greenery really opens the environment up and makes it feel more livable- makes sense, technically there are more living things in the room now! After I jumped on the Fiddle Leaf bandwagon, I’ve been wanting to add a new plant or two to the loft.

Thankfully, I’ve had pretty good luck in the houseplant department thus far {miracle!} and am happy to report, I haven’t had to bury too many green friends in the plant cemetery. Don’t be fooled, by no means am I a green thumb, but sites like my new favorite, The Sill, certainly help me feel more like an expert. They break down the care of the most popular houseplants {they even break down plants by personalities so that you can find the perfect plant for your lifestyle!} and are my go-to reference for the current or future plant lover.

ferm-livingplantsplant

In order to steer clear of the black thumb club, I make sure I’ve aced my one on one time with the employee at the gardening store before I even dare bring a plant home with me. There is something so depressing about watching the leaves on your plant turn yellow and then a whithered brown and feeling like you have no control over nursing it back to health. Isn’t it the worst feeling, ever?

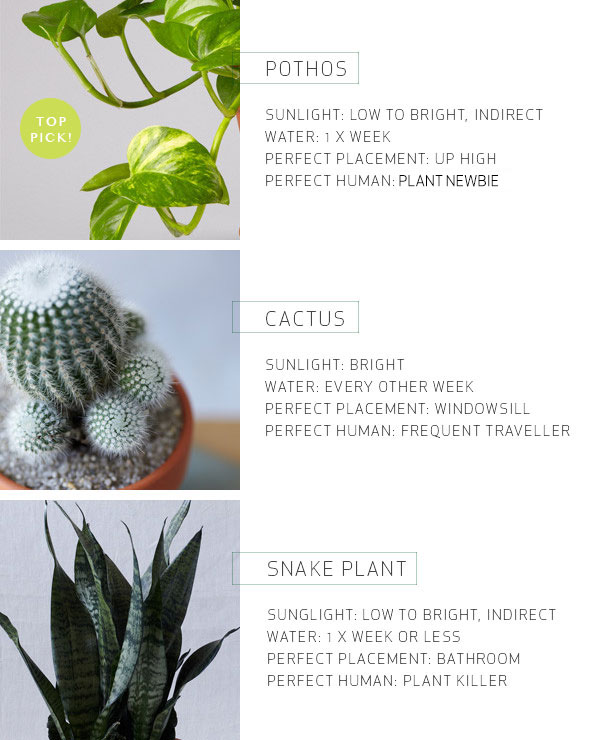
We’re currently reading up on the care guides of these guys {The Sill offers PDF’s that you can download here!} because we want to bring some new life into the new office! Here’s a quick breakdown of our top picks:

apt34-houseplant-care

I vote for something like the Snake Plant which is cool and graphic, but it might be a good idea to have low maintenance guys around like cacti since we’re always running around and are likely to forget to water them! Oops. One thing for sure is that you don’t already, you must buy a Pothos for your home. It’s our go-to plant {besides our trusty Fiddle Leaf Fig tree!} and according to the plant experts, you can take a sledge hammer to it and it won’t die. We’ll see about that…


image 1 via Ferm Living // 2 via Lotta Agaton // 3 via Daniella Witte // plant images via The Sill

When it comes to choosing chairs for the new office {that yes, is still in the works...}, it’s likely we’ll throw all ergonomic rules out the window. Just like a good pair of 5 inch heels, we’re girls who sacrifice function for form. What can we say, our 65 year old selves will hate us, but no pain without a little gain, right?

Narrowing chairs down was pretty easy. We knew exactly where to start and that was with the classics: Eames, Kartell, Wegner. We are also very specific about our color palette: black or white. After going straight to the big boys, we just can’t decide who’s classic chair we love more. It’s almost a design sin to choose one over the other and it doesn’t help that there are such good replicas out there these days, we’re a little tempted to get all four!

eames-dining-chairmasters-chair-kartelleames-chairOffice-chairs

get your shop on: 1 // 2 // 3 // 4

Do we go with the sleek and simple design of the Eames? Wood dowels or eiffel legs? Or do we choose something edgier and eye catching like the Kartell? Sure there are bigger problems to be had in the world than our first world design crisis, but we’re freaking out.

Won’t you help us decide?! We need your vote!

image 1 via Lerkenfeldt Photography // 2 via Fru Fly // 3 via Kenzie Poo

As we make progress on the new Apartment 34 office, I find myself searching high and low for the perfect statement piece. Since we’re going for a very streamlined approach with our updated design, every choice has to be killer.

For the lighting, we’ve already set the bar pretty high – our hammered brass pendants over the desk were a pretty big hit! Don’t worry, they won’t be leaving the office- we’re planning on giving them a new job! But in the meantime, we have to find something equally, if not more amazing, to go over the new team desk. It’s going to be one of the first things you see when you walk in- talk about the pressure- so a lot of eye catching shapes, big arms and pops of gold are calling out to us!

chandelierschandelieroffice-chandelier

get your shop on: 1 // 2 // 3 // 4 // 5 //

Any of these beauties would look amazing over our modern all white work station, but which one is your favorite? If you know of any other gorgeous chandies or pendants, please share.

Here’s our office moodboard one more time just in case you need to refresh your design wheels!

image 1 via Contemporist // 2 via Corinne Gilbert // 3 via Autoban

A new year means it’s time to usher in a new creative project right?! I’m SO excited to announce that we’re undergoing a BIG office makeover this month!! Woot, we’re bringing 2014 in with a whole new look.

As you may remember, I debuted the Loft’s office in Rue Magazine almost a year ago to the day. I will confess it’s a little daunting to think about changing it up so soon. But Team Apartment 34 is no longer just little ole me. We’ve grown so much in the past year. First I brought on interns and we grew. Then I realized I could never let the interns go and we grew. And grew. And grew! The office just wasn’t designed for the rockstar team I have now. So there’s really only one way I can solve this conundrum…

office-makeover-time

That desk built for one just isn’t going to do the trick any longer. So over the holiday break I began playing my favorite game: room-layout jenga! I mentally moved pieces here, there and everywhere and I think we’ve finally settled on the perfect floorplan. Here’s a sneak peek:

OFFICE-FLOOR-PLAN

Of course, this makeover won’t just be an exercise in rearranging furniture. My aesthetic has evovled right along with the business these past 12 months, so I’m planning on putting a whole new spin on the space! Here’s another sneak peek for you: the moodboard!

office-moodboard

We’re taking our digs in a more minimal, modern direction and I cannot wait. With so much action in a relatively small space, I’m excited to have a neutral color palette to serve as our foundation. It will maximize all the great natural light we enjoy and create an environment conducive to fresh ideas. Of course, signature elements like our brass accents and the in-office bar will not be going anywhere. They just might be reincarnated! There will also be a new bold statement or two, but you’ll just have to wait to see what’s up our sleeve.

All this change can only mean one thing: we’re going to need to make space for our new design a.k.a. part ways with some of our absolute favorite pieces. They are all in perfect condition-sadly, they just won’t fit into the new floorplan. But hopefully, you’ll find a way to make them fit into yours because you’re going to get the chance to…

apartment-34-office-sale

That’s right-we’re gonna have a sale and you’re invited! We’ll be sharing all the details later this week so be sure to check back.

We hope you’re as excited as we are!

office image: 1 photography by Emily Johnston // 2 photography by Aubrie Pick // moodboard image top to bottom, left to right 1 via Veranda // 2 via Emerson Fry // 3 via Line Klein // 4 via A Merry Mishap // 5 via Emily Johnston // 6 via Mikkel Mortensen 

I don’t know what it is lately but I have been so drawn to green details lately. From little pops of mint to luscious tabletops to yummy chairs and bright green walls. This apartment, home to graphic designer Tanja Vibe had me at hello as soon as I laid eyes on that mismatched forest green dining chair.

designer-files-november-4designer-files-november

Obviously, there is excess fabulousity in this apartment. I can’t tell which pendants I adore more, the brass one in the kitchen or the copper Tom Dixons over the dining table! Either way, I love that Vibe wasn’t afraid to mix metals as they both glow beautifully against the neutral color palette.

designer-files-november-2designer-files-november-3designer-files-november-5

I am also completely smitten over this shoe storage. It’s clean, simple and I love how gender neutral it is. It’s a beautiful alternative to an entryway closet or console. Bags are hung on knobs, shoes tucked away and keys stashed. To have glass cabinets on top and open shelves on the bottom is a gorgeous visual design choice. And there it is again, of course, that green chair positioned for sitting and taking off shoes {did you spot the green headphones and shoes too?!}

designer-files-november-6designer-files-november-7

Homes that have a cohesive color scheme throughout are my absolute favorite. It keeps you wanting more, wondering what surprises the next room has in store. Where will the pop of green be this time? It’s calming yet bursting with personality. Green is officially on my radar for the loft! Now, to figure out where to put it… Any ideas??

photography by Line Klein // images via The Klein for Elle Decoration UK

Sound the alarm. Alert the people! Apartment 34 dove head first into the realm of DIY this week!! This is a big deal for a self professed DI-buy girl. I’ve tended to take the “lazy” way out, convinced that my creations could never be as good as anything in a store. But with help from my team, I broke out of my comfort zone {and I hate to toot the ol’ horn but…}, we DIY’d something that turned out so many different forms of amazing, I can hardly believe it!

I must first start with a little confession: things haven’t been as organized around here as we may have led you to believe. From hopping on a plane every week to juggling meetings and projects, let’s just say it’s a miracle I’ve even remembered to eat. Things have been shoved behind closed bathroom doors, crammed into cabinets and buried at the bottom of closets – anything to hide the growing mess.

The office closet has suffered the most. You may remember seeing it here and here, always with the doors tightly closed!! I decided it was time to practice what I preach and get back to basics with a good ol’ clean out and DIY upgrade. Here’s how it went down:

3m-diy-closet-upgrade-2

We began with the purge. Everything was cleared out {and laid aside to be sorted. Hours of shredding and trips to Goodwill over the weekend and it’s like a breath of fresh air!}. We went so far as to take out the closet shelves in order to give it a fresh coat of white paint, immediately making her look a million times better. However, that was just the beginning. Your closet is actually a great place to have a little fun with design. We wanted to really bring some fun personality by adding pattern so we set out on Pinterest looking for inspiration.

We came across this and loved the bold statement a stripe makes. We just decided to take it a step or two further. We sketched out our plan of doing one big 4” stripe surrounded by asymmetrical smaller ones, one 2” and 1”, on either side for a little riff on a sporty look!

3m-Sketch-our-plan

Once we had our supplies in hand: ScotchBlue Painter’s Tape, paint, a handful of brushes and measuring tools, we were set! We wanted a subtle color palette so we chose Chalkboard White as our base and Benjamin Moore’s Sail Cloth as our accent {with a little gold craft paint thrown in for a glam touch}!

3m-SuppliesIt's-time-to-Diy-3m

We started by finding the middle of the cabinet and marked off every six inches from top to bottom, setting where our big stripe was going to be. Starting from the top, we followed our marks, taping off the middle section. We found it easiest to just use one big piece of ScotchBlue Painters Tape. Trust your eye, if you see your line going a little crooked, double check your measuring and just lift up the tape and rework it. It’s so easy! Then simply paint inside your ScotchBlue Painter’s Tape column.

3m-diy-measuring

When the paint is dry to the touch {about 30 mins for a single coat}, lift up the tape. You’ll have a perfect stripe!

3m-Pulling-off-tape

A key to making asymmetrical patterns work is to make sure you’re working with the same spacing on both sides of the middle stripe for balance. So we taped off our most outward stripe of the pattern and worked our way back in towards the middle.

During the creative process we felt like challenging ourselves even more. DIY is all about improvisation, right? So, we strayed from our original sketch a little. Thinking another gold painted stripe would be too heavy, we called an audible and used gold striped Washi tape instead!

3m-washi-tape

We also decided to paint the face of each shelf to give an often overlooked detail a touch of shine and glam! We used Martha Stewart’s Metallics line in gold and really liked the reflective quality it has.

3m-painting-gold

Et voila! There you have it. The perfect backdrop for a beautiful cabinet, closet, wall, dresser…the possibilities of where this look can work are endless.

final-pattern-3m-diy

Here’s a little sneak peek of the finished office supply closet! We’re so excited how the entire project turned out. You’ll just have to stay tuned for the full reveal – we promise it’s coming soon!!

3m-diy-closet-sneak-peek3m-diy-finished-sneak-peekorganizational items from The Container Store, Dwell Studio and Muji

And of course we had to do a little happy dance when we were done!!

that's-a-wrap-3m-diy

scotchblue, scotchblue painter's tape, painter's tape, tape

This post is a collaboration with ScotchBlue™ Painter’s Tape. To join the creative community, visit www.facebook.com/ScotchBlue. All opinions are my own. Thanks for supporting posts that keep Apartment 34 doors open! 

original photography for apartment 34 by aubrie pick // styling and art direction by erin hiemstra

One of the best things about being asked to be a part of the Sunset Reimagined Home last spring wasthe artists and designers’ works that I had the honor of featuring. I was particularly hunting for that one piece that would have the biggest impact in the home office: the desk! I wanted it to be a piece of mastery, something that would make people’s jaws hit the floor {and be something I wish were in my own home!} Thankfully, I found the shop that would provide me with just that: Monroe Workshop.

Monroe Workshop is a design shop based out of Los Angeles, run by head designer Matt Monroe. They specialize in made-to-order, beautifully hand crafted furniture. The wood work that goes into each piece is unmatched as far as I’m concerned. The wood is the silkiest, most velvety surface you’ll ever touch and the deep, rich, organic grooves of the grains are beyond amazing.

Matt and his wife Jen invited us into their LA studio for a behind the scenes look at the process and exclusive sneak peeks at their new designs. We also had the pleasure of seeing three Monroe Workshop pieces in a client’s beautiful home! Of course, we also had to pick Matt’s brain on his sources of inspiration and business advice {the shop was just launched last year – crazy success!}. I’m quite confident you’re going to be as inspired as we were!

Monroe-WorkshopMonroe-Workshop-studio

First, for those of you who weren’t able to see it in person, we’d like to introduce you to the the Independence Desk above that I used in the  Sunset Office! It currently sits in the studio’s showroom amongst some amazing pieces, including the wall of fans sculpture Matt sledded to the Continental Divide in 2008. So seriously good.

The Amarillo Slab Dining Table is just as fabulous. The brass-plated bug like legs are quite the glamorous touch.

Monroe-Workshop-Designer-Files2Monroe-Workshop-Products-3Monroe-Workshop-2

Wood work is kind of a lost art. Tell us a little bit of how you got into it and the start of Monroe Workshop.

This company feels like a natural progression for me. I always liked building things as a kid. During high school I started working in construction and after college I worked for a high end furniture company (BDDW) in New York for several years. Eventually, I went on to study sculpture in graduate school and got my MFA at Cranbrook Academy of Art. I find carpentry very satisfying and making fine art creatively challenging. Hand making fine furniture allows me to enjoy both. 

Monroe-Workshop-ProductsMonroe-Workshop1

Your pieces are so unique and thoughtfully crafted. Where do you find your inspiration? 

I’m inspired by midcentury modern classics and the Arts and Crafts movement. I love the work of California woodworker Sam Maloof. A lot of high end furniture is formal and serious and I try to create pieces that are more fun to interact with, so people are more comfortable using them in everyday life. I’m also influenced by the neon world we live in and like to pop in an unexpected color.

Monroe-Workshop-9Monroe-Workshop-5Monroe-Workshop-Tabletop

Starting your own business is a challenging process. It’s about a lot of decision making and risk taking. Did you have a sink or swim moment? 

I did custom work building other people’s designs for several years and for me to go out on my own with a furniture line was a big leap. Having the rocking chair featured in Dwell was a nice, validating moment.

After taking that leap, what has been the most surprising thing you’ve learned about running your own business? 

Everyone probably says this, but it’s harder than I expected. It’s really tough balancing the creative work of designing and building each piece with running and developing the business. I keep ruining my laptop by getting too much sawdust in the keyboard.

Monroe-Workshop-7

Your beautiful wife Jen helps you run the business. What’s it like working with your life partner? How do you keep the balance? 

I wish I had Jen full time but she’s a film producer with a busy career that she loves. She’s been a huge part of starting the business and I couldn’t have done it without her support and creative input. It’s a whole family affair – our kids love coming to the shop and have been (safely) playing with tools since they were babies!

With all of your success and looking back, what advice would you give your 25 year old self? 

Sleep now, while you still can! With starting a business and two kids under 3, no one gets much sleep around here.

Monroe-Workshop-Products5

So what’s next for Monroe Workshop?? They’re constantly coming up with new inventory and are working on pieces to sell at a range of different price points. Matt gave us a sneak at the current designs he’s working on!

One of Matt’s simply spectacular designs is this solid walnut dining chair with a beautifully sculpted seat and equally gorgeous joinery work. It’s absolutely stunning. I’m also incredibly excited about the blue trimmed slab tabletop. It’s the first piece in their “Fake Slab” line. Instead of being made from a single found slab, an incredibly rare thing, they have engineered a way to make plywood have the same sculpted edges and organic look at a lower price point! Genius. I can’t wait to see the final piece!

Monroe-Workshop-ChairMonroe-Workshop-Tabletop-2Monroe-Workshop-BenchMonroe-Workshop-11

Isn’t all of this work incredible??

I want to thank Matt and Jen so much for inviting us into their world.I am so honored to have had the opportunity to feature their designs! You have to check out their entire site here.

original photography for apartment 34 by Kat Harris // images 3-5, 7-10, 16 via Monroe Workshop // photography by Laure Joliet

Older posts
Gimme More