It’s a week of reveals around here. Or at least sneak peeks. Today, you’re getting a preview of my kitchen! I’ve teased about its design in the past (here, here and here to be exact), but I couldn’t’ be happier with the final result. One of the keys to creating a dream kitchen is picking the right appliances. There are a ton of choices out there, but I knew I wanted three things: the highest quality, great functionality and gorgeous design. Case in point: my refrigerator.

apt34_thermador2

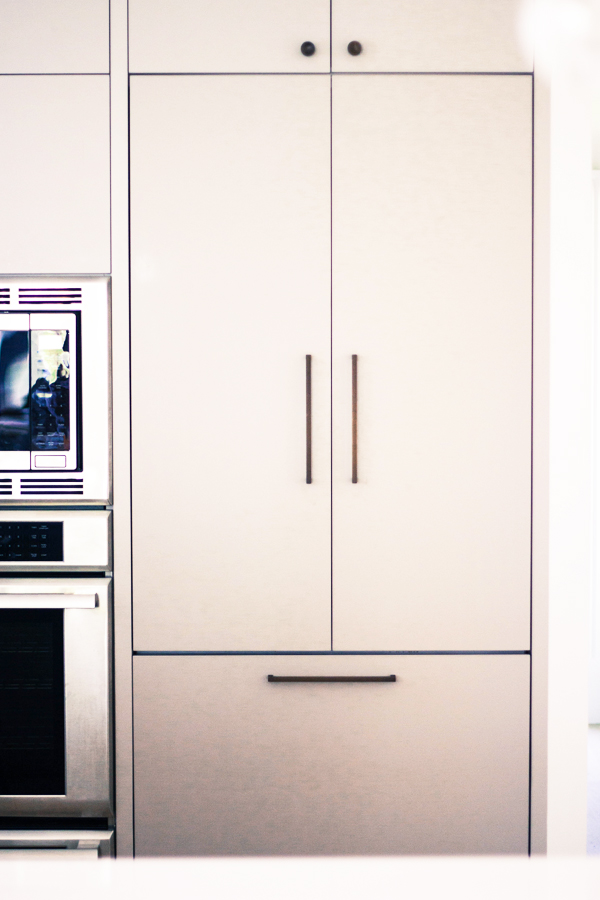
Don’t you just love it? Wait – you can’t see it!? That’s because I knew from the get-go that I wanted an integrated refrigerator. That’s when your refrigerator is covered to look like the rest of your cabinetry. Appliance trends tend to come and go and I wanted to ensure our kitchen would be timeless. Mission accomplished (if I do say so myself)

When it comes to amazing appliances there are only a few obvious options out there, but after doing my research I was sold on Thermador. The timing happened to be ideal – Thermador is celebrating their 100th anniversary this year – so they seemed fitting for my 100+ year old house! Thermador intentionally designs their their appliances to function as fully-flush integrated refrigeration that can seamlessly blend into virtually any design, and offer as much or as little refrigeration, freezer and wine preservation you desire.

apt34_thermador1

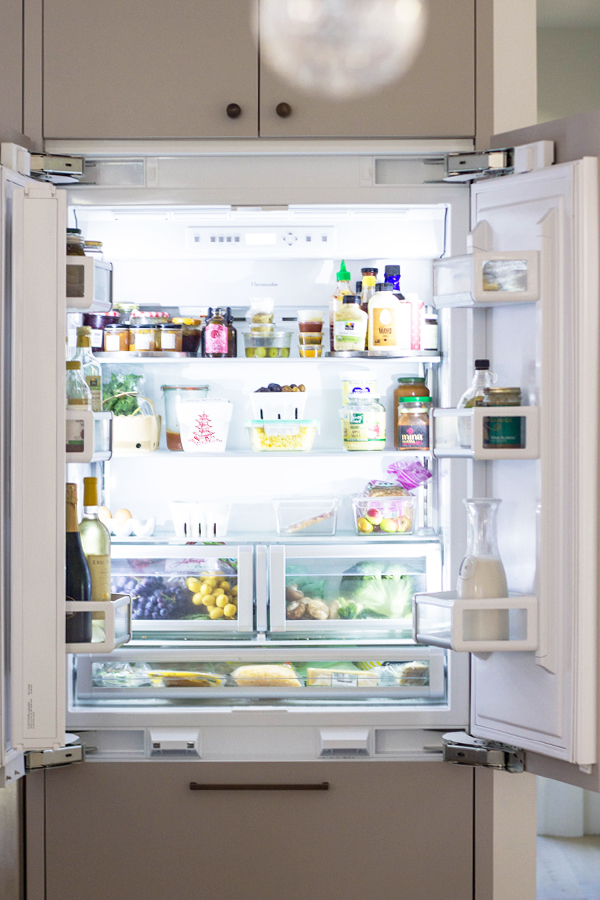
We ended up selecting the Thermador Freedom® Collection refrigerator with french doors and freezer drawer below and I could not be happier. Thermador explains that their refrigeration system features technology that ensures better temperature management for optimum preservation. Basically, that means it keeps things really fresh for a really, really long time. Seriously, I’ve been so impressed. Our food doesn’t go to waste anymore. Th refrigerator drawers are sealed so the temperature flowing around the drawer keeps the contents fresher longer, up to twice as long. I used to hate opening the refrigerator only to have my chosen ingredient gone bad. Thing of the past!

But what I really love about my Thermador refrigerator is how it lets me store everything easily and most importantly, beautifully. The refrigerator features a full width meat drawer (which I’ve actually coopted for cheese), gallon door bins and adjustable shelves. It also has the best lighting of any refrigerator I’ve ever used. Turns out that’s all intentional too. Thermador placed its LED theater lighting on the sides of the columns to ensure that everything in the column can be seen and all labels are readable, making it even easier to spot those secret ingredients the cook has hidden way in the back.

apt34_thermador3

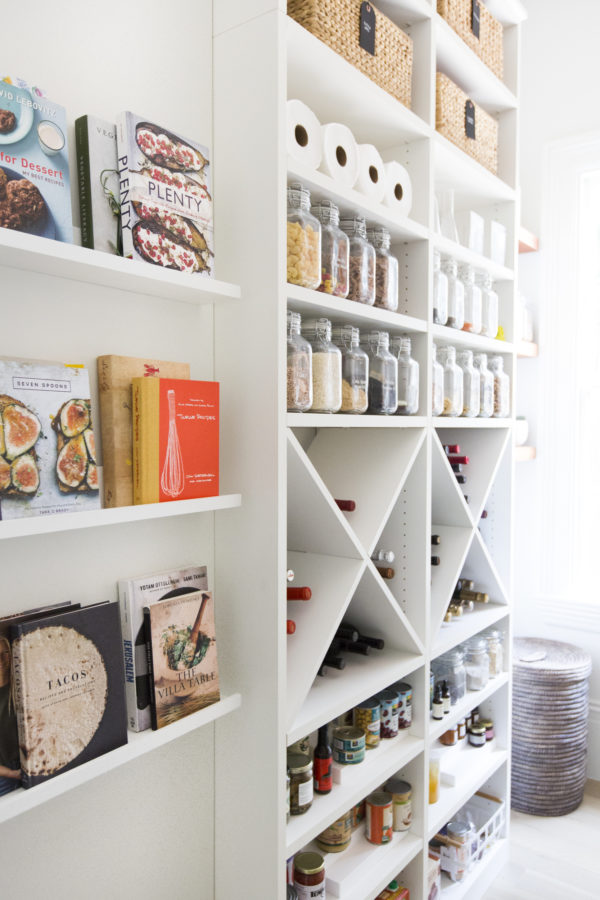
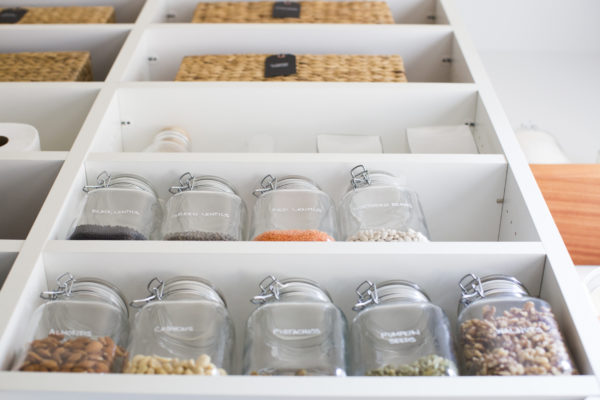
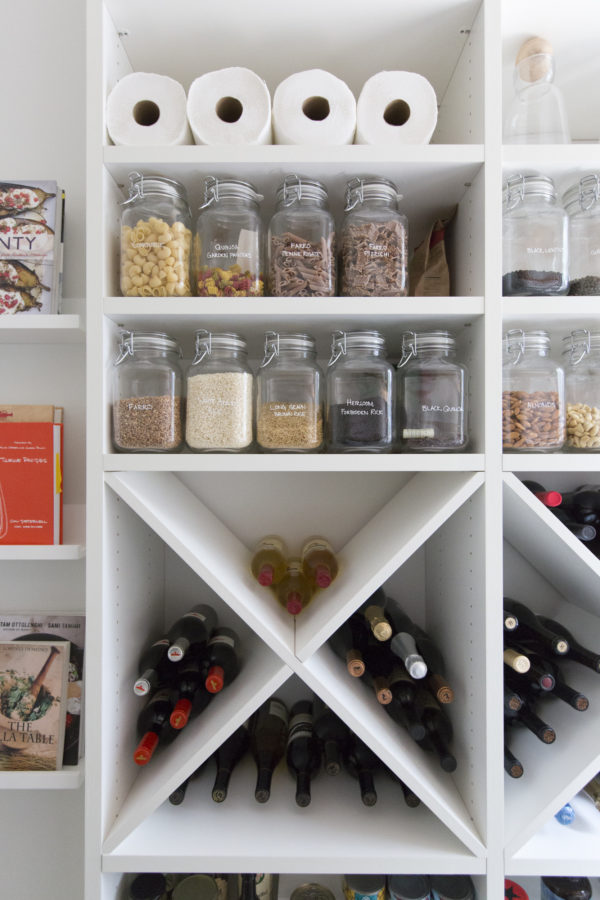
Since I’ve been on an organizing kick lately (have you toured my pantry yet?), I turned to the professional organizing gurus at Neat Method to wave their magic want on my refrigerator as well. There are a few easy ways to take your fridge organization to the next level. I thought I’d leave you with Neat Method’s top refrigeration organization tips. I making use of them on the daily now and feel much more pulled together every time I open my fridge!

How should you approach organizing anything – fridge, kitchen, closet?

Don’t think it has to be all done at once. Organization should be done one space at a time or else you can get easily overwhelmed, burned out and quit. Even just getting one shelf or family of items, like nail polish, together, edited and binned, can feel like a major accomplishment. And it should!

When it come to creating an organized fridge what is the most important thing to consider?

Visibility. If you don’t see it, you won’t eat it and it will go bad.

What is the biggest complaint you hear about refrigerators?

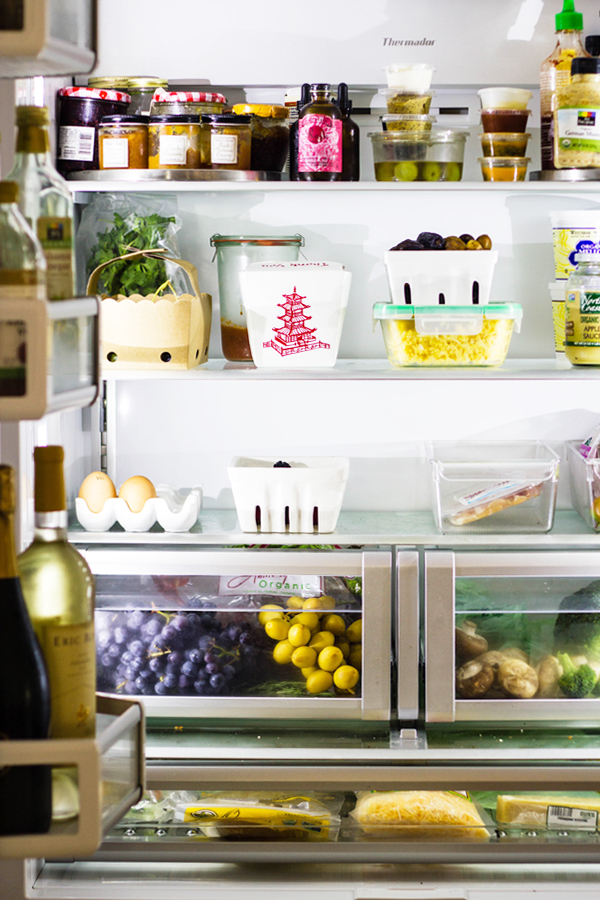
Food is frequently lost/misplaced/forgotten. I have a two-fold strategy to combat this. One is clear glass food storage. Your prepared foods will always be visible. No more scary tinfoil package in the back corner everyone avoids. The second step is creating a leftover shelf or area in your fridge. If you need a quick lunch or dinner, you will know exactly where to reach and food is less likely to go bad. I even repackage take-out in my glass storage. This way I can see what’s in there and my refrigerator looks less chaotic with the coordinating storage containers.

How often should you “reorganize”?

A refrigerator should be “touched-up” every week or any time you do your big grocery shopping trip. All leftovers, produce and raw meat should be looked over to make sure they are still good. All new containers of hummus, cottage cheese, etc. should be rotated to the back so the partially full containers can be finished first. And it’s a good idea to take a quick peek in any vegetable or meat drawers to make sure nothing got “lost” in the back.

What are your top three tricks of the refrigerator organization trade?

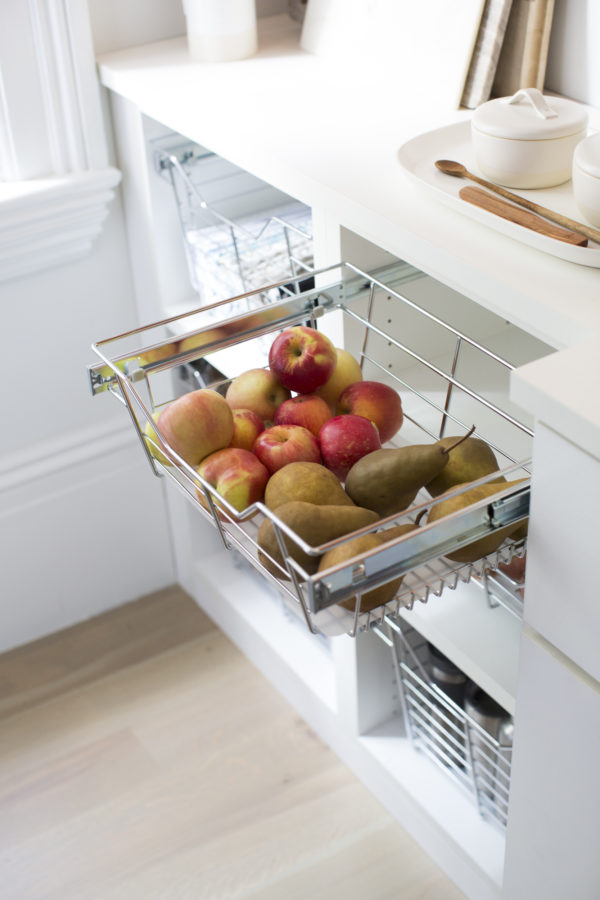
1: Washing all refrigerated fruit immediately (besides berries) and placing them in an open container to encourage people to eat them. Something like a white ceramic berry basket or a pretty ceramic bowl. You can quickly pull the bowl out and set it on a table for a snack then it goes back in when done.
2: Make sure raw meat is in a drawer or separate bin that is easy to pull out and clean. No matter how on top of it you are, meat can leak and create havoc on your fridge.
3: Lazy Susans are a great way to corral condiments and encourage people to use them. If you see them, you will use them. (I love ours!)

SHOP THE POST

[show_shopthepost_widget id=”2071788″]

Last week I discussed how I’m surviving living in our unfinished renovation: trying to find places to organize amidst the chaos. Well, one of my best opportunities to do that was with my pantry. First off, I’m still in shock that I actually have a pantry. Nothing has ever made me feel more adult – not having the baby, buying the house…nope. It’s this massive space to organize canned goods that makes me feel like I just might finally have my sh** together. Jury’s still out.

apt34-pantry-after1

But back to the design! So I have this large room – think of a giant shoe box, but with 10ft ceilings. I wanted the space to be highly functional and serve multiple purposes. Not only is it my primary storage for all food-stuffs, but I also wanted to create additional prep and work space for things like our coffee maker and kitchen tools we use less often like my KitchenAid mixer and my juicer (sadly. I keep swearing I’m going to start using it again!). To say I’m happy with the final result is a major understatement. But I won’t pretend to take all the credit for the final result. I called in the big guns for this job including California Closets to design the storage and Neat Method to help me get myself organized.

But let’s go back to the very beginning. Here’s where there room started out. This goes a whole year+ back to when our walls were still open.

apt34_pantrybefore

You can kind of make out the frame of the pantry in the middle of the pic. 

To make sure this space both worked perfectly and looked amazing I worked with designer Paige Gordon at the Bay Area California Closets to help devise the ultimate storage solution. It was not the easiest of tasks given the relatively narrow space, crazy ceiling height and the massive (original) window at the end of the room. Sadly, all that gorgeous molding actually limited some of our design options as we only had four inches of space along one wall.

To accommodate that, Paige designed a double stack of floor to ceiling shelving on the left hand wall as you enter the doorway. It left a little space between the shelves and the window (how we used it, I’ll get to in a minute). I also wanted to include wine storage because it’s real purdy (and it is how all mothers of toddlers survive). The x-shaped wine boxes Paige designed offer the maximum amount of space and look like a wine cellar. It’s also up off the floor to stay away from tiny fingers. Love.

apt34_pantry_before2apt34_pantry_before3apt34_pantry_before4

On the right-hand wall we added closed storage for some of the less pretty things, a section of baskets for things like fruit, potatoes and linens as well counter space that runs wall to wall. Happy dance! A bit of open shelving at a lower height is perfect for things like art & crafts supplies for my kiddo. All the shelving heights are adjustable to accommodate changing storage needs. With this design, the room is fully utilized and maximized. All of the California Closets cabinetry is in white finish with a slight faux wood grain. Like I said about our laundry room, when I think of utilitarian spaces I think white and bright and I’m so happy with the result. But let’s get back to the fun part – the after!

apt34-pantry-after-3

I also wanted to put in open shelving as it’s my favorite thing ever. I turned to a carpenter to create shelves for the space above the California Closet cabinetry. I wanted to use natural wood to warm up the room and match some open shelving that will also go in the kitchen. I’m so thrilled with the result.

apt34-pantry-after-4apt34-pantry-after-5

When it came to getting my organization game together as it pertains to everything that was actually going into this room, I turned to Neat Method. They are an amazing service staffed with professional organizers that will come to your house, inventory everything you already have, help you figure what else you should have and then devise a plan about how to store it not only effectively (aka easily accessible, easy to see, easy to keep track of what you need), but also to make your organization beautiful. Added bonus: they don’t just tell you how to to it. If you need, they’ll actually do it for you. Hello crazed, overworked, overbooked mom savior from heaven! I mean, just look at my shelves.

apt34-pantry-after-6apt34-pantry-after-9

This is proof positive that everything looks better decanted. Packaging will just make your eyes cross. I love the uniformity and zen quality of everything being in the same type of container. We may have gone a bit glass jar crazy, but I love it. And each jar is labeled. I went with white written directly on the jar for a more subtle look. Cooking instruction for whatever is inside each jar is simply tucked inside at the back. (The label can be changed with a just a bit of rubbing alcohol). Baskets on the upper shelves contain more random things, cleaning supplies that need to stay out of a toddler’s reach and the stuff I use really infrequently. All organized and labeled of course.

The great thing about a pantry like this, as Lisa Ruff my Neat Method guru explained to me, is that everything is visible. When things are hidden you forget about them and don’t use them. This leads to things going bad and a lot of waste. Now I know what is at my fingertips at all times. All my food stuffs are organized into sections. Nuts, grains, pastas, baking, snacks, canned fruits or veggies. It’s made grocery shopping so much more efficient because now I know exactly what I need and I can avoid the annoyance of being in the middle of a recipe and not having a necessary ingredient.

apt34-pantry-after-6apt34-pantry-after-12apt34-pantry-after-7apt34-pantry-after-10

Now I also have space for paper goods and my ever-growing collection of pitchers and vases. It is so amazing to finally have places for all that stuff to go!

apt34-pantry-after-8

One of my favorite moments in the room is right as you walk in the door. Just to your left I hung picture rail shelves to display my collection of cookbooks. It’s so fun to get to see the covers because that’s why you buy a cookbook half the time anyway, am I right? While I started with three shelves, my collection is so big I’m thinking I’m going to have to add a couple more above. Thank goodness for step ladders!

So there you have it. While the rest of my house looks like we moved in yesterday (not nearly 5 months ago), my pantry is currently my little happy place. I may just go and stand in there from time to time. No judgements.

Oh and if you are in need of some organization help, right now you can get a FREE consultation from the Neat Method. Just mention Apartment 34 when you contact them (which you can do right here).

For the rest of the updates about our remodel CLICK HERE or to read about the history of our historic San Francisco Victorian CLICK HERE

original photography for apartment 34 by michelle drewes

One of the best things about a major move is the opportunity to declutter. It can take a little time and persistence but the results of a good ole purge are so worth it. Case it point – the bathroom. It’s so easy for counter tops, medicine cabinets or drawers to get overstuffed. Guilty of keeping that half full bottle of nail polish because you might like that color again someday? I’m guilty. Or wanting to try every tonic or serum your favorite beauty blog just wrote about? Guilty. Or only clean out your make-up drawer once a year? Totally guilty. Turns out, according to a recent study 71% of American couples have actually argued over a bathroom-related issue (such as hogging storage space, not tidying up and not replacing toiletries). I actually would think it’s even higher!  I swear the amount of bath products I keep on the counter always seems to spontaneously multiply. So when our move presented a chance at a fresh start, I committed myself to keeping our bathroom clutter-free.

apt34_bathroom_style2

Five easy steps have helped me keep my counters clear for three solid months now so I thought I’d share them with you!

STEP 1: Dump the junk. I started by hucking any and everything in my bathroom that I hadn’t used in awhile. Aka, if it was more than three months old and I hadn’t touched it, it went buh-bye. That random clay mask, I kept telling myself I’d use some Saturday night? See ya. My collection of multiply bath salts for the 3x a year I take a bath? Gone. Random salt spray for my hair that I use…never, eyeshadow I used last holiday season, an overflowing collection of old makeup brushes? All kicked to the curb. And it felt good.

apt34_bathroom_style6

STEP 2: Identify the necessities. It can be so easy to accumulate random bath products. So I’m doing my best to whittle down to what I know we will use everyday. I particularly love unisex products that can do double duty. Sure we all share toothpaste and the like, but it can be harder to find places where bath products overlap. That’s why I was stoked to learn about the newest body lotion from Lubriderm. It can be a hand lotion or a body lotion and is intended to be used by the guys too! One less product to clutter things up? Sold.

apt34_bathroom_style5

STEP 3: Put things in pretty containers. I love decanting. I’m a bit of an addict. My dish soap, shampoo and condition, laundry detergent. I love how pretty containers gives a nice uniform look to everything. I think it gives me a sense of calm in my otherwise chaotic life. Regardless of my deep seeded reasoning, I’m a sucker for beautiful jars. These dark glass jars are by Infinity Jars and I’m in love.

apt34_bathroomstyle8

STEP 4: Add some life. The danger with beautifully empty counter space? It’s hard to resist the urge to fill it. Pretty perfume bottles, a new serum, a pretty tray. It seems innocent but accumulation seems to feed on itself. I find the best way to protect yourself is to ill the space in the first place! A nice plant adds some unexpected life to a bathroom and thrives in the steam filled room. It’s also become a personal mission to hunt down pretty bath products. A sleek black toothbrush, pretty smoked-glass tumbler and my favorite diyptique candle add a little upscale touch so that my bathroom can remain a more spa-like space.

apt34bathroom-style-3

STEP 5: Repeat steps 1-4. At least once every 3-4 months.

No matter how hard you try it can be tough to keep bathroom clutter at bay, but with a little discipline, I’m going to be able to keep it this way.

PS: this is the first sneak peeks of our bathroom so I thought I’d share my sources! Counters are White Zeus by Silestone / faucet & sink are Kohler / hardware from School House Electric / tile is by Fireclay Tile / Round mirror by Ikea / bath towel from Anthropologie

This post is in partnership with Lubriderm. Thoughts and opinions are 100% my own. Thanks for supporting collaborations that we’re excited about and that have kept Apartment 34’s doors open.

When you’re planning a trip, do you feel the need to run out and pick up a whole new wardrobe? Yeah, me too. So when I got the chance to go on my first international trip since having le baby, I felt frantic, like I needed to create a massive shopping list immediately. That is, until I realized there was actually an entire wardrobe waiting for me – in my own my closet!

Thankfully, my friend Caroline Rooney, a talented fashion stylist and style expert, reminded me that you need to look at your existing closet with a fresh eye. With one quick trip through the pieces I already own, Caroline helped me realize I could devise an entire packing plan without having to buy a million things. So I thought I’d share a few of her tips about how to shop your closet. And bonus, you get a sneak peek at my closet that I designed with California Closets! I won’t lie – it’s basically a dream closet come true.

DM1_9410   DM1_9433

this shirt by Kamperett is hand-painted and seriously stunning

To get over the feeling of “having nothing to wear,” I needed to get out of my outfit rut. I hate to admit it, but I’ve totally fallen victim to the mom uniform of tee, jeans and sneakers – on massive repeat. I expected better of myself but when you’re a professional toddler chaser practicality often wins out. That’s why a trip is such a great excuse to rediscover your style. And while I consider myself reasonably decent at getting myself dressed, anyone can benefit from an outside perspective.

DM1_9484 DM1_9596

A camel blazer is a girl’s best friend

DM1_9458

This Amour Vert dress is perfect for an afternoon lunch in Milan!

DM1_9413  DM1_9434

Caroline came in and was able to look at all my pieces with a fresh eye. She was a like a kid in a style candy store. She started pulling out things I hadn’t even looked at in months.

But stay focused and be productive we decided to set some parameters. When you’re packing for a trip it’s helpful to think about two things; your destination and what you’re going to do while there. You want to think about your destination’s customs so that you can be sure to dress appropriately. In my case, Italy is a bit more formal, a bit more sophisticated and a bit more fashion forward than California, so I wanted to create some looks that feel pulled together. I also knew I was going to be doing a lot of wine tasting, sight seeing and doing lots of dinners out so I need a variety of looks from day time casual to much more formal.

So we got to pulling out tops, skirts, even dresses that I hadn’t worn in forever. After shopping through my own closet (it was like visiting old friends!), the trying on commenced. I cannot recommend taking the time to actually try your clothes on enough. Whether you’ve gone through a big life change like having a baby, or simply haven’t revisited pieces in your closet for awhile, it is so helpful to remind yourself what the clothes look like on you. You’re much more likely to remember why you bought the piece in the first place.

DM1_9531DM1_9574DM1_9602DM1_9605  DM1_9528 DM1_9566DM1_9439  DM1_9548DM1_9582     DM1_9617

Caroline helped me combine my pieces into looks I had never even thought of. Throwing a leather jacket over a dress and pairing it with low-heeled sandals made it more causal and perfect for day time. Adding a blazer over a classic black tee dressed it up, while wearing flat sandals with my white trousers made the look perfect for a day of window shopping in Milan. All told, I was able to create more than enough looks with just a few pieces. In fact, I probably could have pared things down even more, but I am one of those people who likes to be over-prepared for a trip. I do like to have options should itineraries, the weather or my mood change! While I could have easily edited things down to fit into a single carry on, I did end up bring a few additional options. Plus my size 10 shoes are not very space efficient!

But with two pairs of a jeans, a pair of trousers, a couple of dresses, a skirt, a mix of casual & formal tops and two blazers I knew I was going to be able to see Italy in style.

apt34-packing3apt34-packing4apt34-packing

And as an added bonus for you all, Caroline, who works on photoshoots with brands like Google, Macy’s and W Hotels, as well as with private clients, is sharing her top five tips for making the most of your own closet.

TIP 1: Keep your closet tidy so you can access all of your garments easily. Out of sight, out of mind! Hang your favorite pieces toward the front for easy access. If there’s a piece that you haven’t worn recently, or find intimidating, hang that in the front as well, so you can remember to try it out in a new way. If it stays there for a few weeks and you still haven’t worn it, donate it or give it away.

TIP 2: I prefer to organize a closet by the type of garment. That way, you can see all of your top options, then all of your bottoms and skirts, all of your dresses, and then all of your jackets. Keep sweaters folded to avoid hanger marks at the shoulders, and fold down your jeans to save space. If you’re a die-hard denim head like me, fold all of your jeans the same way, and stack according to style. I keep mine in organized piles like “Everyday”, “Flares”, “Distressed”, and “Summer/Whites”. This saves me from digging through the piles every morning (and having them topple to the floor!)

TIP 3: After cleaning your closet, create piles for donations, sale, alterations. I recommend that you do this every 3-6 months to make sure you’re getting the most out of your wardrobe, and not wasting both time and money shopping for pieces you already have!

TIP 4: It doesn’t help you to have a dress that doesn’t fit, or a new pair of jeans that you love, but are too long. A great tailor can give these pieces a new life. In Erin’s closet, we first organized and hung favorite pieces, and even pulled a few items out of storage. This made the pieces feel new – it’s really like shopping in your own closet!

TIP 5: As you’re developing your wardrobe, focus on investing in well fitting basics. Look for timeless pieces that you can mix and match for years, and never look “out of style.” Then layer in a few trendier pieces every season. Invest in the basics, and spend less on the trend items that will go out of style faster. And once you’ve worn the trendy pieces to death, and see the trend starting to fizzle, donate or consign the pieces. You’ll be left with a great backbone of basics to build off of for the next season.

If you’re looking to add a little Italian style to your closet right now, below are a few of my favorite pieces. And as an added bonus, Amour Vert is  offering Apartment 34 readers a special bonus. You can save 20% on any order when you enter the code APT34 at check out! Click HERE to start shopping.

And if you’re curious about my adventures in Italy at the moment, be sure to follow along on Instagram and Snapchat!

apt34-italy-gethelook

SHOP THE POST

white dress / cuyana saddle bag / black pumps / leather jacket /sunnies / white trousers / peplum topsandals / stella mccartney blouse


original photography for apartment 34 by delbarr moradi

Mondays are never easy to face, but it’s always better when you have a inspiring space to work. Now that we’re getting settled, I’m turning my sights on my home office. I guess I should call it my home office to-be since the space is completely empty currently. I’m typing this sentence from my couch on my teeny tiny laptop. And this just cannot go on any longer!

I’m definitely suffering from home office envy.

apt34-home-office-inspoapt34-home-office-inspomain.original.640x0c (9)apt34-home office -inspotumblr_nwx90gSsoW1qjd76eo1_1280stilinspirationhomeofficeworkinprogress1

There are a few key things I’m coveting for my new work space. I’ve got a major crush on trestle desks at the moment. Inspired by architects drafting tables, they’re utilitarian but chic at the same time. Keeping a desk drawer free also forces you to keep clutter to minimum. Because no one really needs staplers or paperclips anymore!

I’m also loving the look of warm woods mixed with monochromatic accents. It feels timeless. There’s been a bit of an acrylic, gold and white glut in home offices of late – bouquet of peonies included of course. I’m in the mood to take more understated approach with classic pieces that I’ll love right now, five years from now and even twenty years from now.

I’ve long been a fan of picture rail shelves. They offer a unique way to create a moodboard of sorts. You can mix art, magazine tears and your favorite objet. I’d just have to keep myself from rearranging on a daily basis. I’m not sure that’d be great for my productivity.

Finally, you can add a shot of individual personality to your work space with your office chair selection. I prefer a-typical office chairs. Vintage pieces, old dining chairs, a funky side chair. This is where I really want to spend time treasure hunting. You just want to ensure that you select a chair that is high enough to give you proper posture and comfortable enough for you to sit for long periods at a time. Trust me, I made the mistake of prioritizing aesthetics over proper alignment in the past and paid the price.

Now that I’ve got a vision for my new office, I’m off to pull this space together! If you have any favorite sources for great office pieces please send them my way. Of course I’ll be sharing what I find in my search.

Find reams and reams of home office inspiration right here.

images 1 waiting on martha / 2 dust jacket in the attic3 my domaine / 4 lark & linen5 tumblr /6 stil inspiration / 

We’ve all heard about it. The capsule wardrobe. It’s all the rage these days (and yes, I want to try it once we move into the house). But I’ve always wondered how difficult it would be to stick to the capsule. Whether you edit to the magic 37 pieces or simply attempt to streamline a bit for each season, I think the empty closet would kind of taunt you. That’s why I’m loving the idea of displaying your capsule wardrobe on a meant-to-be-scene clothing rack.

35806116_028_b36037539_010_b35780162_070_b (1)36029163_001_b38631826_010_b

rack 1 // rack 2 // rack 3 // rack 4 // rack 5

I was pleasantly surprised to discover that Urban Outfitters is cornering the market on gorgeous clothing racks. Whether you want to hang a beautiful brass one from the ceiling or only have enough space to lean a small rack against a wall, they’ve got an option for every space. And if you style your stuff up right, you could have one of these racks in your living room!

What do you think? Are you giving the capsule wardrobe idea a try? How are you organizing it?

In rearranging our loft to make way for little Carter, I may have given up the Apartment 34 Studio space, but I definitely still needed somewhere to work! We also still needed a spot for guests to stay. And I dreamt about how nice it would be to have a little quiet retreat to escape to…So to the upstairs I went. What was once our bedroom has now been transformed from this….

apt34-on-apartmenttherapy19 copy

To THIS!

Apt34-LoftRedesign-1Apt34-LoftRedesign-25

The first thing I did after our bed headed downstairs was paint the walls white! The lofted room only has 7ft ceilings so I needed to do something to make the space feel as expansive as possible. I’ve been a sucker for Benjamin Moore White 01 paint for quite some time. It’s the perfect soft white. It’s amazing what a fresh coat of paint can do for you!

While the upstairs feels much bigger now, actual square footage is still very limited so I had to hunt out as many space-saving solutions as I could. The first score was my adorable mid-century inspired desk. It’s just big enough to hold my computer and that’s all I really need. Sure, I loved all my gorgeous office accessories, but really, when is the last time you used a stapler – even if it is an acrylic one?!

Apt34-LoftRedesign-26Apt34-LoftRedesign-29Apt34-LoftRedesign-22Apt34-LoftRedesign-24Apt34-LoftRedesign-11

I also wanted to create a little reading nook for the few spare minutes of relaxation I can grab between naps, so a set of picture rail shelves now serve as my magazine rack + place to display personal photos. I love how I can swap out titles to completely change the look. Two black and white botanic art prints from Buddy Editions, framed beautifully by Simply Framed add a nice contrast to the neutral color palette. They really ground the space. Carter also likes to come up and hang out with mama while she may or may not be catching up on email!

All in all, I’m really pleased with how this room turned out. It’s mult-functional, it maximizes every available square inch and just feels inviting. Now the husband often has to go looking for me because I’m tucked away up here!

If you missed the rest of the loft makeover, check it out right HERE.


home office resources: west elm floor lamp // west elm mid-century mini desk // gold speckled cowhide rug // american leather sleeper sofa // jessie balck throw pillows // simply framed custom frames // buddy edition art prints // gap bag as basket // pottery barn kids activity gym // heath ceramics bud vase // diptyque candle


original photography for apartment 34 by aubrie pick

#Shelfies are the new #selfies, right? They’re a way to express your personality in one small snap. Just like playful hairstyles and experimental makeup, you can continually switch them up depending on your mood. And just like the selfie, perfecting them ain’t easy! In fact, building your library of books and compiling a collection of curated items requires a lot of patience. But no matter where you are in your shelfie game, remember these three rules and you’ll have a perfectly styled bookshelf every time.

bookshelfbookshelf-stylingbookshelf-styling-5bookshelves-2

Here are three tips to getting it right:

#1: Horizontal x Vertical Books. Shelves should start with books, but mix up the way you display them. Try piling them horizontally or flipping the spines to face inward as well as keeping some standing vertical.

#2: Remember the 1:1 Ratio. For every stack of books, add an object. It could be anything: a candle, brass box, pretty collection of rocks, that awesome “thing” you couldn’t not buy at last month’s flea market. This is the best way to break up the ‘boxy library look’.

#3: Create Curated Character. The more your personality shows in your shelfie, the better! Add black and white photos of your grandparents as strapping, young lads. Display your vintage toy car collection. How about that piece of drift wood you picked up in Tulum? The quirky things that make you you, give your shelfie just as much character!

bookshelf-styling-4styling-shelvesstyling-a-shelfbookshelf-styling-3

And here are 12 no-fail objects that’ll elevate your shelfie game in no time! Seriously, every shelfie should have these on display:

bookshelf-styling-101

GET YOUR SHOP ON

> 1. Brass Sculpture
> 2. Coexist Globe
> 3. Na Nin Candle Landslide
> 4. Saal Wood Pyramids
> 5. Brass Planter
> 6. Menu Concrete Lamp
> 7. Petrified Wood Bookends 
> 8. Collection of Parchment Books 
> 9. Saikai Pound Door Stopper 
> 10. Black Footed Ceramic Bowl
> 11. Small Gold Bowl
> 12. Antique Brass + Glass Boxes

For more stellar styling inspiration, you’ll want to peruse this Pinterest board!

image 1 via Apartment Therapy // 2 via Smitten Studio // 3 via My Domaine // 4 via Home Adore // 5 via Broste Copenhagen // 6 via My Dubio // 7 via Lonny // 8 via Style Me Pretty 

Everyone understands the importance of a good spring cleaning, but why only reserve a fresh start to once a year?? The change in weather already forces you to swap your shorts for sweaters so while you’re knee deep in your closet, might as well keep the momentum goin’, right? I, for one, know that my house needs a serious deep clean and this cute and simple Idea to Steal has me excited to purge and organize!

WardrobeOrganizing_walk-in-closet

I love the idea of using a super chic brass towel rack to organize your belts, jewelry and sunnies! These are some of the most awkward accessories to keep tidy. Belts don’t keep shape when you roll them, necklaces get tangled and sunnies just take up so much counter space. This simple fix would SO solve my problem of always hunting for my latest fave pair of sunglasses!

I know I’m not the only on out there with this problem. How do you manage all those random bits and baubles? If you need more Ideas to Steal to help organize your life, check them out here!

via stylizimo

Older posts
Gimme More